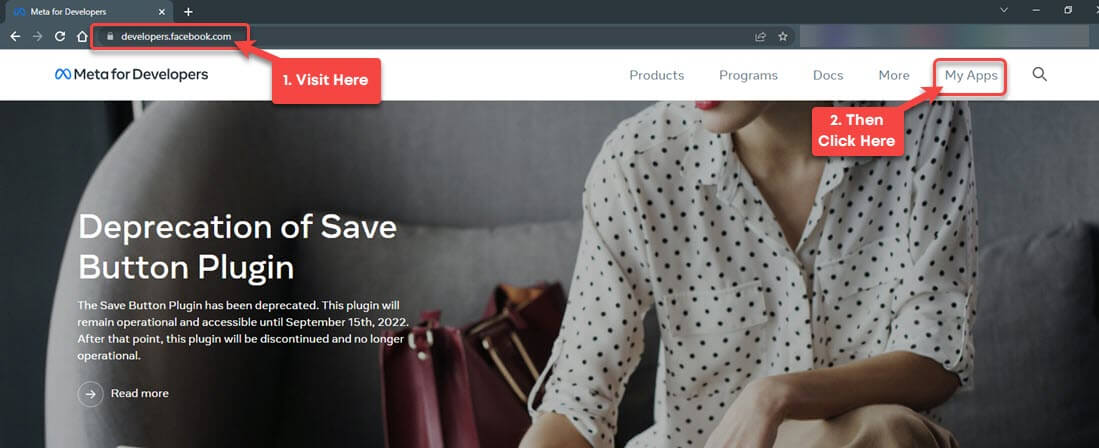
# Cloud API

### Overview

Cloud API from Meta is an official API to allow developers and businesses to use WhatsApp Business APIs for sending and receiving messages over WhatsApp without hosting their own servers. Using this, you can manage up to 80 messages (combined both sent and received) per second, including text and media.

This guide will help you connect Rampwin Channel to Cloud API and initiate the conversation, send notifications, purchase updates, and more.

{% hint style="warning" %}
To follow this guide, ensure you have an active Meta Developer account.
{% endhint %}

### 1) Create a WhatsApp Application

To create a WhatsApp application, first, go to Meta for Developers ([https://developers.facebook.com](https://developers.facebook.com/)), then head over to My Apps.

<figure><img src="https://files.gitbook.com/v0/b/gitbook-x-prod.appspot.com/o/spaces%2FhElFPtMZjXYjDDMBT5q2%2Fuploads%2FuogAQ8SX4RZwrC3ibLHd%2FAccessing%20My%20Apps%20at%20Meta%20for%20Developers.jpg?alt=media&#x26;token=b693b382-24ee-4fa6-9b17-8ccaa707ab4e" alt=""><figcaption><p>Meta for Developers</p></figcaption></figure>

Then, on the apps page, click **Create App**.

<figure><img src="https://files.gitbook.com/v0/b/gitbook-x-prod.appspot.com/o/spaces%2FhElFPtMZjXYjDDMBT5q2%2Fuploads%2FlCfTuNvcnGjiFtCgwP74%2FCreate%20App%20Button%20at%20Meta%20for%20Developers.jpg?alt=media&#x26;token=50fc7026-6df6-42ec-8bef-e900d41a4a75" alt=""><figcaption><p>Create App</p></figcaption></figure>

Then choose other option and click on next.

<figure><img src="https://290002001-files.gitbook.io/~/files/v0/b/gitbook-x-prod.appspot.com/o/spaces%2FURHq2UUVreYyIs2nEwlr%2Fuploads%2Fr642y3zmLx0ycpbGwPej%2Fimage.png?alt=media&#x26;token=f82bf431-f73c-47d8-937d-627e64869287" alt=""><figcaption></figcaption></figure>

This will open a new page, where you've to select your app type.&#x20;

<figure><img src="https://files.gitbook.com/v0/b/gitbook-x-prod.appspot.com/o/spaces%2FhElFPtMZjXYjDDMBT5q2%2Fuploads%2FcP7l9WquFU0qldUn5fXO%2FSelecting%20WhatsApp%20App%20Type.jpg?alt=media&#x26;token=0c67ac41-6a4d-4571-a44a-14f099310766" alt=""><figcaption><p>
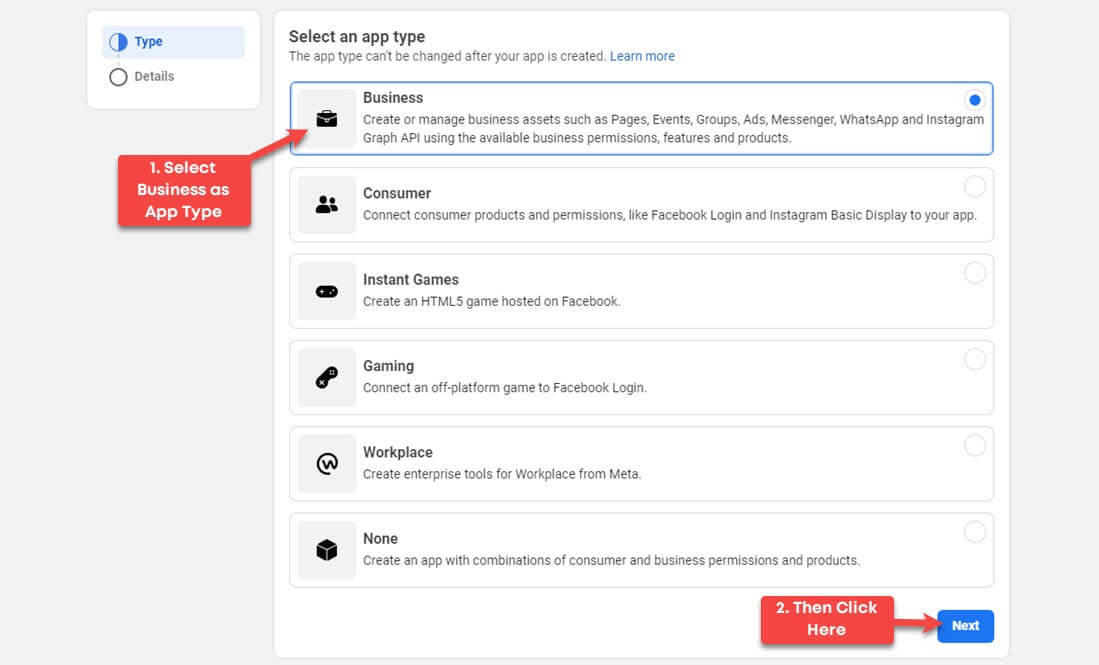
Selecting WhatsApp Application Type
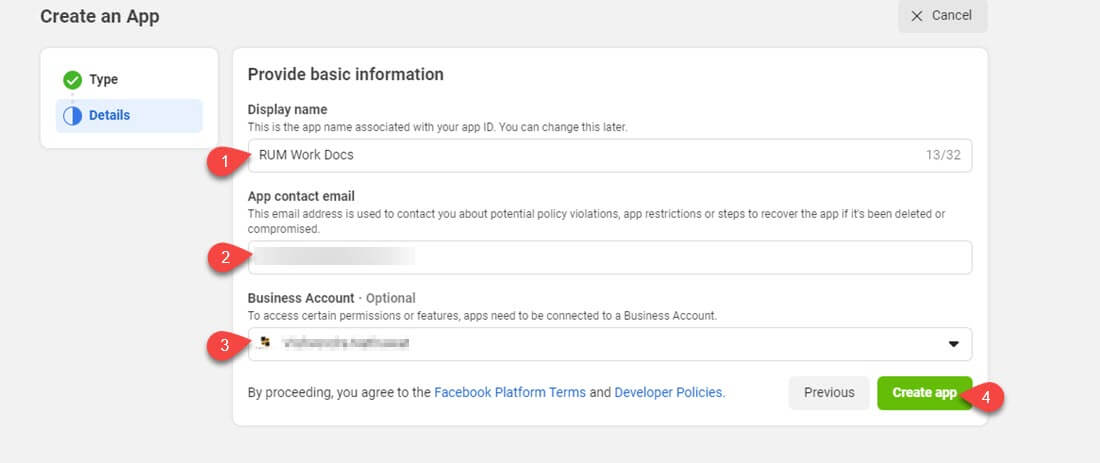
</p></figcaption></figure>

Select **Business** and then click *Next*. On the next page, you need to enter details for the application. Make sure you add the correct information to avoid suspension or blocking of the app.&#x20;

The details it needs are,

* Display name - It's the name that'll help recognise your app in the app library.
* App contact email - The email which will Meta use to notify about different events related to your app.
* Business Account - The manager who'll have complete control over the app.

<figure><img src="https://files.gitbook.com/v0/b/gitbook-x-prod.appspot.com/o/spaces%2FhElFPtMZjXYjDDMBT5q2%2Fuploads%2FQqEkVZ2yvKfcvqvBIE6c%2FCloud%20API%20WhatsApp%20App%20details.jpg?alt=media&#x26;token=46f969c2-648c-434a-9351-dc41432ed7b3" alt=""><figcaption><p>App Details Page</p></figcaption></figure>

Enter the details as applied, then select your Business Manager and click *Create app*.

{% hint style="info" %}
An email will be sent to the email address you've added. Make sure you verify the account using the link mentioned in it.
{% endhint %}

### 2) Add Products to Your App

As soon as you click the Create app button, it will redirect you to the following page. Here, you can see different options that you can utilise for your app.

<figure><img src="https://files.gitbook.com/v0/b/gitbook-x-prod.appspot.com/o/spaces%2FhElFPtMZjXYjDDMBT5q2%2Fuploads%2FB6rjHVWNGMs6bpkhwmdb%2FApp%20Screen%20with%20product%20options.jpg?alt=media&#x26;token=4afdabc4-0e42-4c68-a79f-173f3119b2c0" alt=""><figcaption><p>
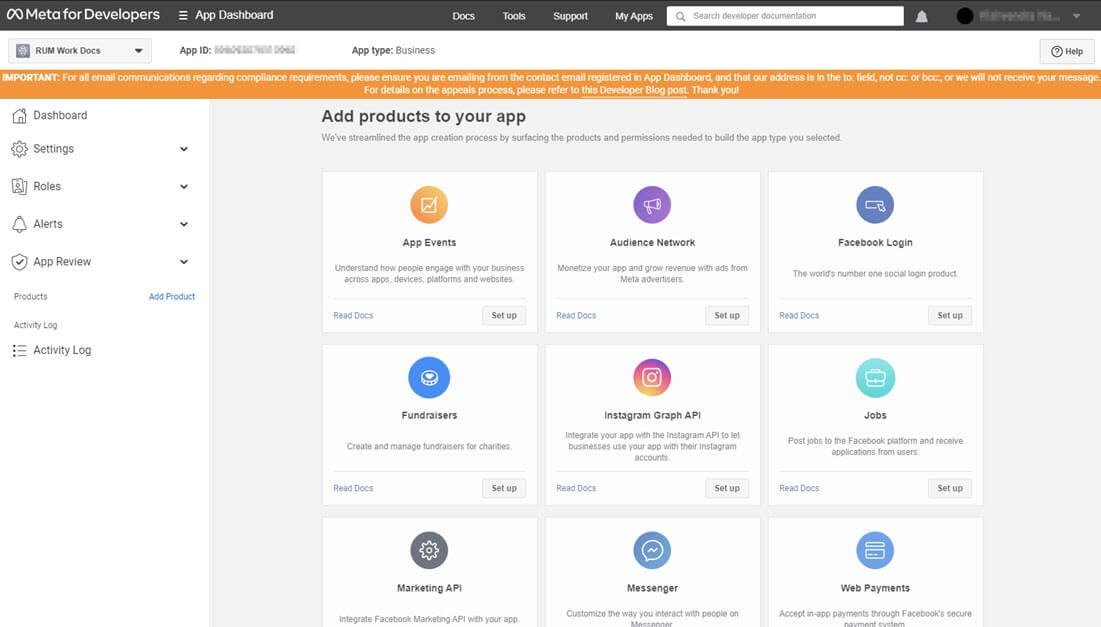
Add Products to Your App Screen</p></figcaption></figure>

Now, on this page, you've to scroll down a bit and click **Set up** for WhatsApp.

<figure><img src="https://files.gitbook.com/v0/b/gitbook-x-prod.appspot.com/o/spaces%2FhElFPtMZjXYjDDMBT5q2%2Fuploads%2F23xa8QSpbgjixcJKY6Y9%2FSet%20up%20WhatsApp%20application.jpg?alt=media&#x26;token=3ba4a306-f77f-47f8-a259-ed10bd2ab39f" alt=""><figcaption><p>
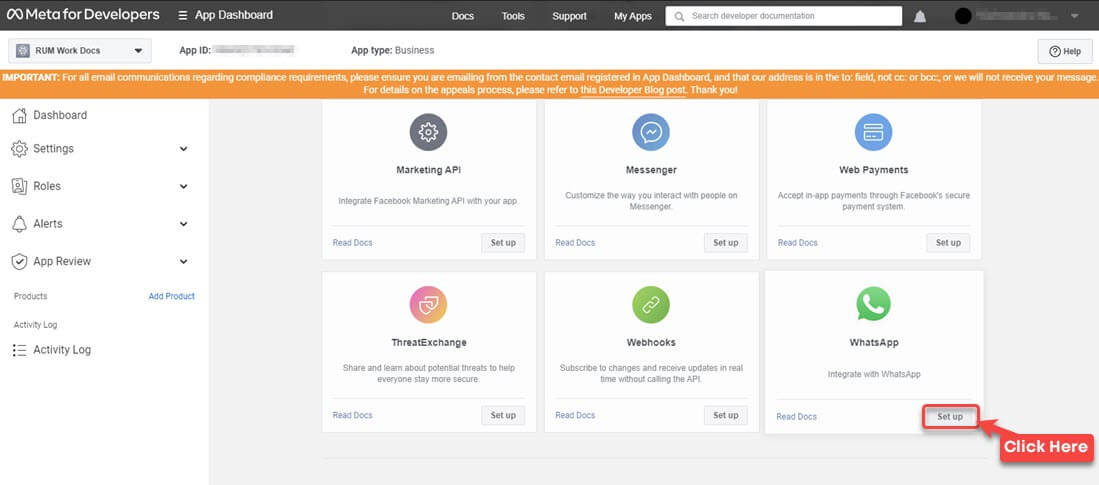
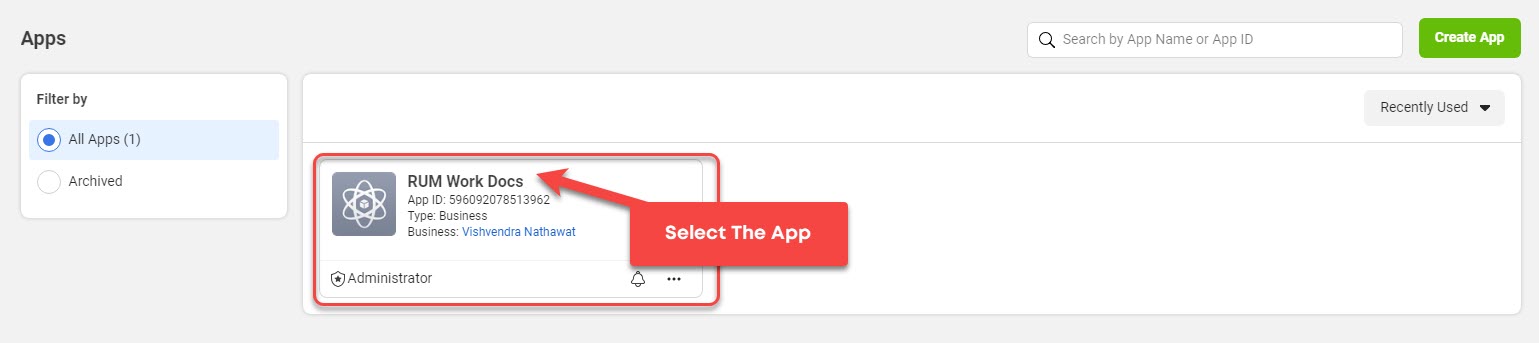
WhatsApp to Set Up as Application</p></figcaption></figure>

A new page will come up asking you to confirm details for WhatsApp Business Platform API. Check your details and then click **Continue**.

<figure><img src="https://files.gitbook.com/v0/b/gitbook-x-prod.appspot.com/o/spaces%2FhElFPtMZjXYjDDMBT5q2%2Fuploads%2FM6TCjeOAuPDdLO8pGmsg%2FContinue%20with%20WhatsApp%20Business%20Api%20Platform.jpg?alt=media&#x26;token=7af32f34-1d50-4410-a239-dda6b21caca4" alt=""><figcaption><p>
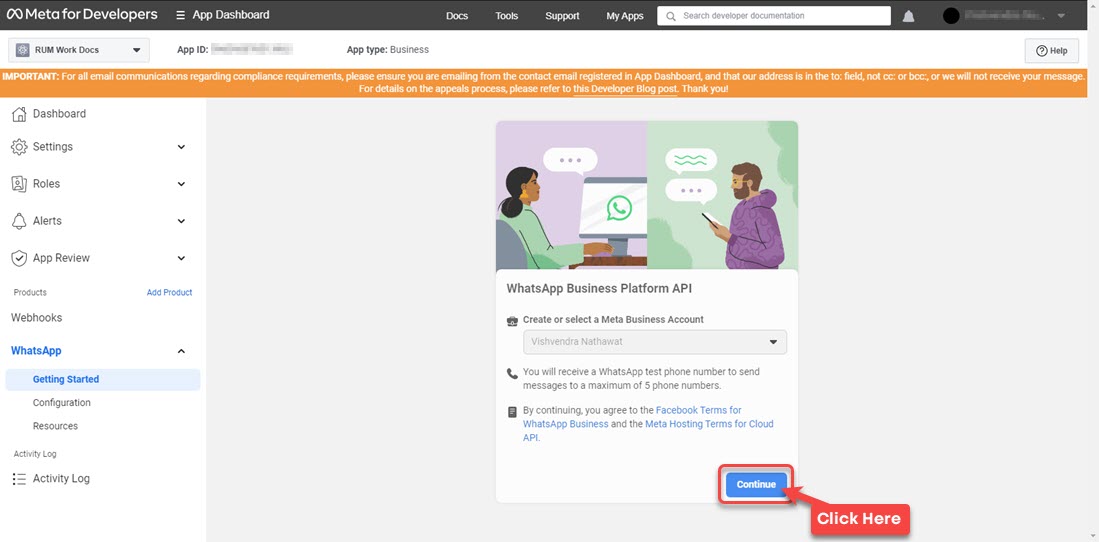
Continue With WhatsApp Business Platform API</p></figcaption></figure>

As you continue, the Getting started page will open with a temporary access token, test number and more.

<figure><img src="https://files.gitbook.com/v0/b/gitbook-x-prod.appspot.com/o/spaces%2FhElFPtMZjXYjDDMBT5q2%2Fuploads%2FGyjQOp1aHMSd5Y4VzWvw%2FGetting%20started%20page%20with%20temp%20access%20token%20and%20more.jpg?alt=media&#x26;token=5f73a444-9f7b-4ba1-b66c-2c140c1d08f8" alt=""><figcaption></figcaption></figure>

Here, scroll down and click on **Add Phone Number**. This will bring a popup to fill in your business information.&#x20;

<figure><img src="https://files.gitbook.com/v0/b/gitbook-x-prod.appspot.com/o/spaces%2FhElFPtMZjXYjDDMBT5q2%2Fuploads%2FadXuJOs7ySf7R1UVTJaR%2FFill%20in%20your%20information%20at%20Meta%20Developers%20page.jpg?alt=media&#x26;token=7cf22c03-8dc0-44e7-9add-758ba1e62fd2" alt=""><figcaption><p>
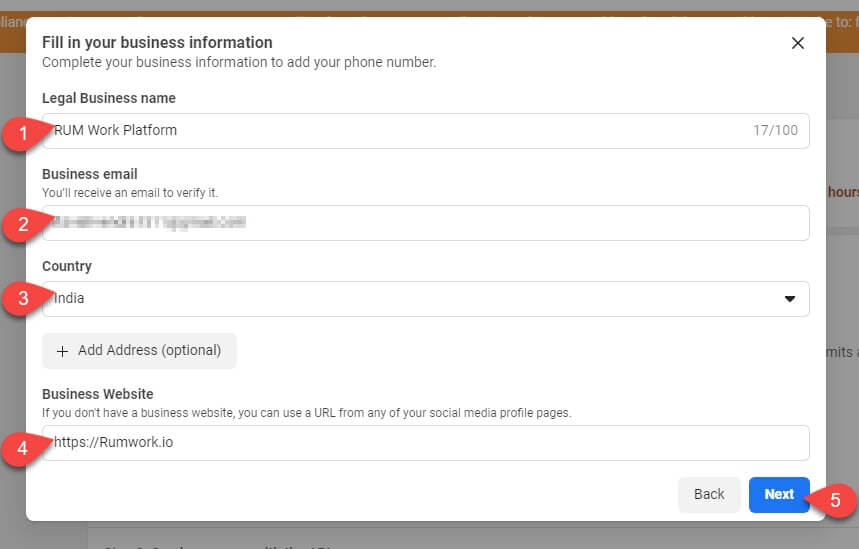
Business Information Form</p></figcaption></figure>

You need to fill,

* Legal Business Name
* Business Email
* Country
* And Business Website

After entering the details, click *Next*, and it will bring fields to create a WhatsApp Business profile.

<figure><img src="https://files.gitbook.com/v0/b/gitbook-x-prod.appspot.com/o/spaces%2FhElFPtMZjXYjDDMBT5q2%2Fuploads%2FBuMsjekXjT5pioeXEe4m%2FCreate%20a%20WhatsApp%20Business%20Profile%20for%20Cloud%20API.jpg?alt=media&#x26;token=6a788ca2-937e-409a-a6c6-dc9283a3dbee" alt=""><figcaption><p>
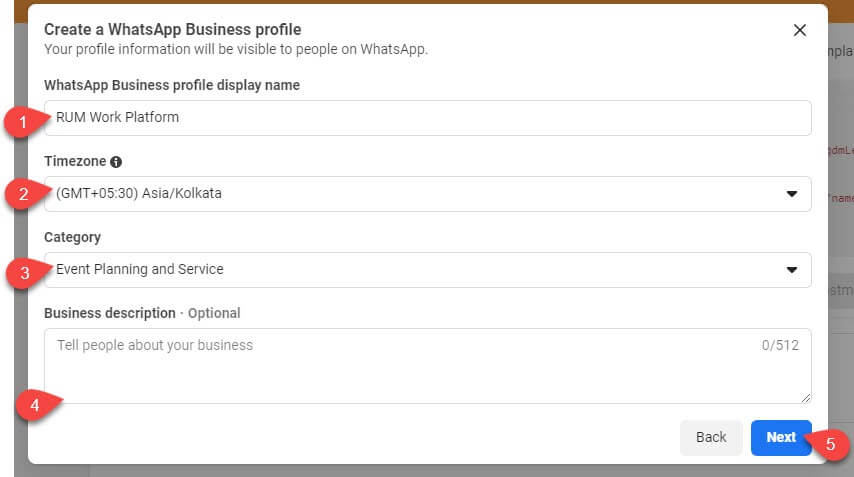
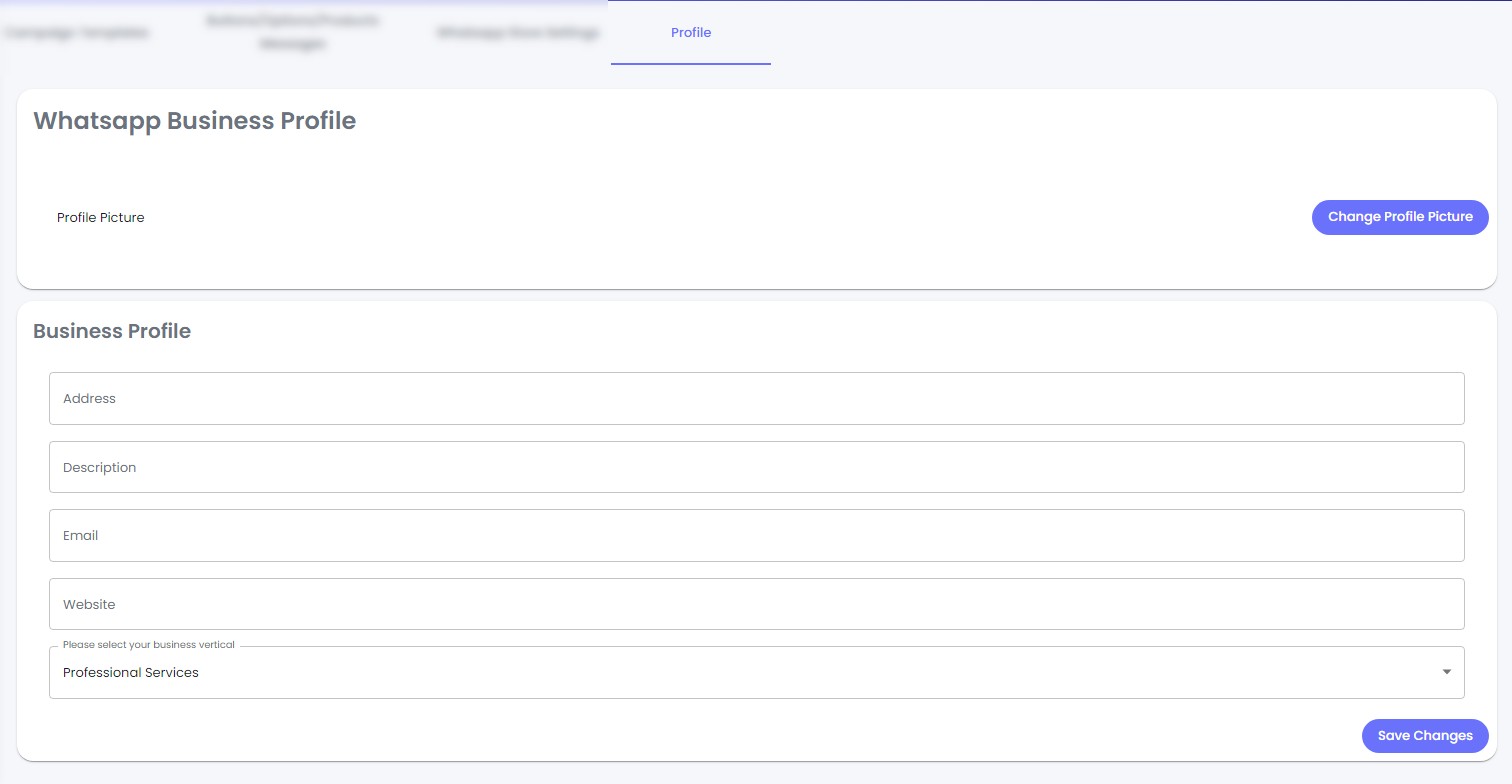
Fields to Create a WhatsApp Business Profile</p></figcaption></figure>

The details now it needs are,

* WhatsApp Business Profile display name
* Timezone
* Category
* And Business description

Simply enter the details and click *Next*. This time it will bring the field to enter your phone number.

<figure><img src="https://files.gitbook.com/v0/b/gitbook-x-prod.appspot.com/o/spaces%2FhElFPtMZjXYjDDMBT5q2%2Fuploads%2FqBHCVB2e13TUXN4K7UN2%2FAdd%20a%20phone%20number%20to%20WhatsApp.jpg?alt=media&#x26;token=ae29421c-3f81-41d2-9aab-4431589baf9d" alt=""><figcaption><p>
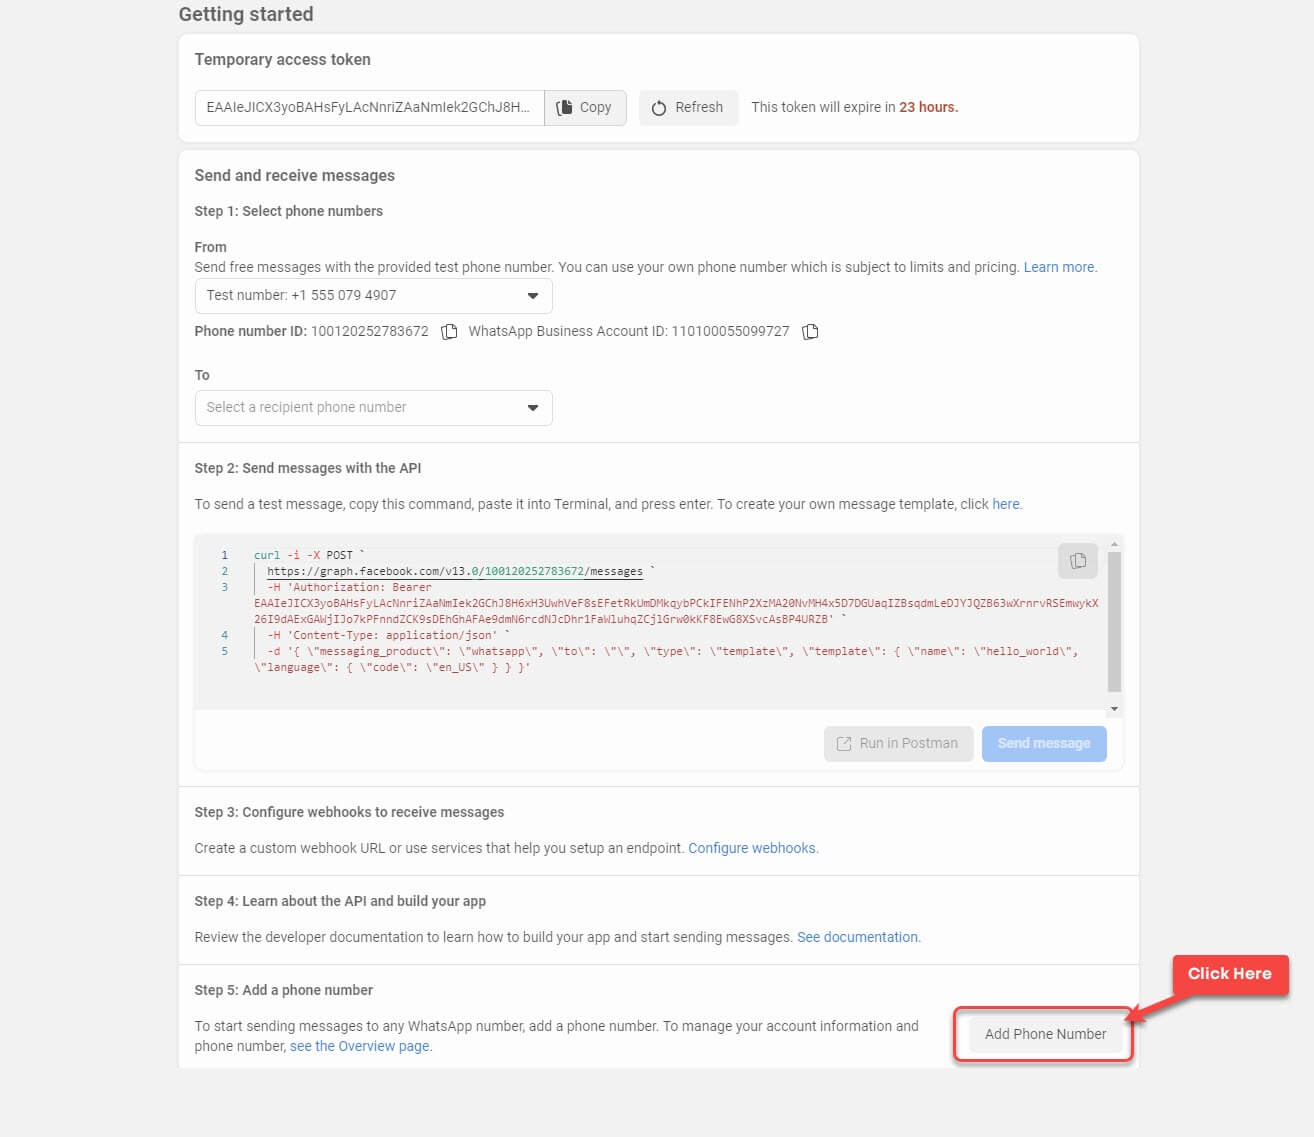
Adding Phone Number for WhatsApp</p></figcaption></figure>

First, select your country code, then enter the number. After that, choose how you want to verify it, and then click *Next*.

<figure><img src="https://files.gitbook.com/v0/b/gitbook-x-prod.appspot.com/o/spaces%2FhElFPtMZjXYjDDMBT5q2%2Fuploads%2FAc6XrigrAoe6tgc1qLOD%2FVerifying%20WhatsApp%20Number.jpg?alt=media&#x26;token=9416d190-5f79-4b4d-82fd-f6f54c688365" alt=""><figcaption><p>
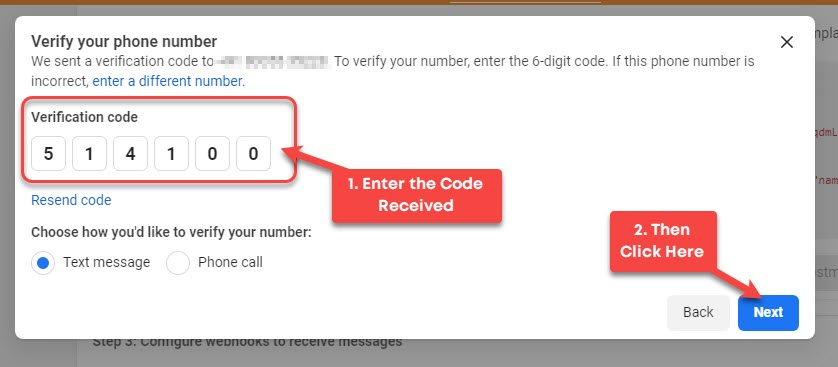
Verifying the Number</p></figcaption></figure>

Enter the code you've received and then click **Next**. Once the number is verified, you must check whether you're WhatsApp Business profile is created or not. To do that, go to the *Send and receive messages* section on this page.

<figure><img src="https://files.gitbook.com/v0/b/gitbook-x-prod.appspot.com/o/spaces%2FhElFPtMZjXYjDDMBT5q2%2Fuploads%2Fdeq7FX7AoCwS1ctGfWKR%2FSend%20test%20message%20From%20number.jpg?alt=media&#x26;token=d9f778d1-1e36-4c3b-a4d0-372b8e0b54b6" alt=""><figcaption><p>
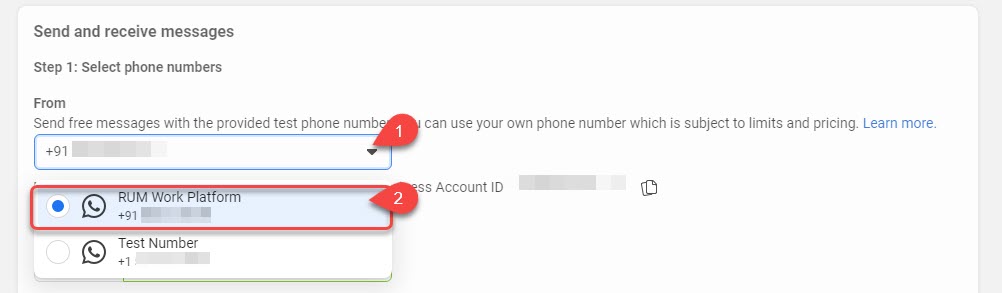
From Field to Test the Number</p></figcaption></figure>

Then, select **Test Number** in the *From* field. Or you can continue with the default.

<figure><img src="https://files.gitbook.com/v0/b/gitbook-x-prod.appspot.com/o/spaces%2FhElFPtMZjXYjDDMBT5q2%2Fuploads%2F4ywunnAVyqs4BwG4Cxv6%2FTo%20field%20for%20testing%20the%20number.jpg?alt=media&#x26;token=03d927e2-7228-4a82-a544-97b5049e7d52" alt=""><figcaption></figcaption></figure>

In the **To** field, enter the number you want to send the test message.&#x20;

<figure><img src="https://files.gitbook.com/v0/b/gitbook-x-prod.appspot.com/o/spaces%2FhElFPtMZjXYjDDMBT5q2%2Fuploads%2FDaPnucb5iu1InehmsWEO%2FSending%20a%20Test%20Message.jpg?alt=media&#x26;token=983fa6a2-0ee2-4db8-9299-7771457681a2" alt=""><figcaption><p>
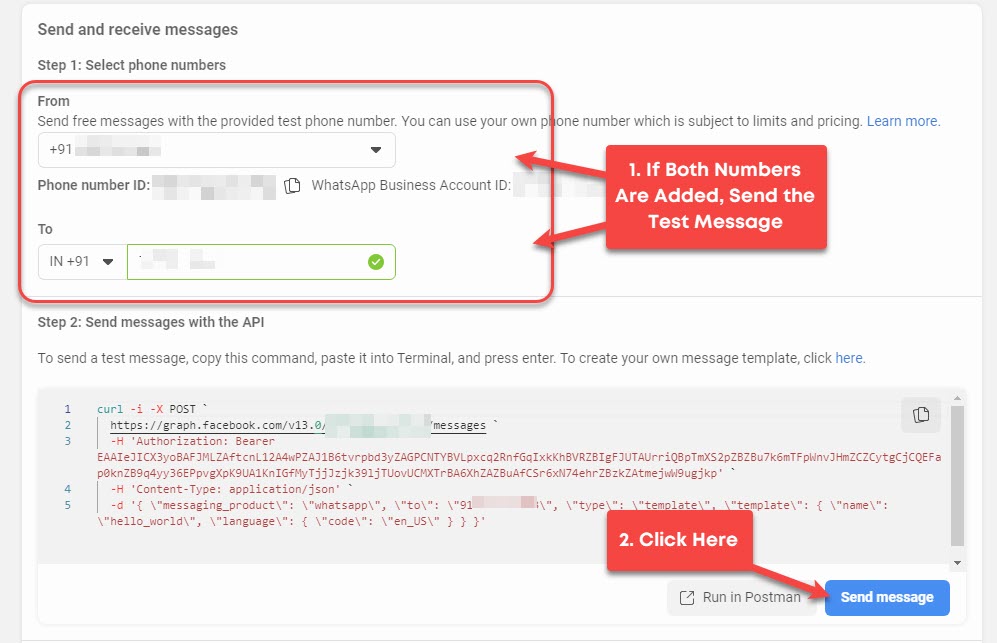
Sending a Test Message
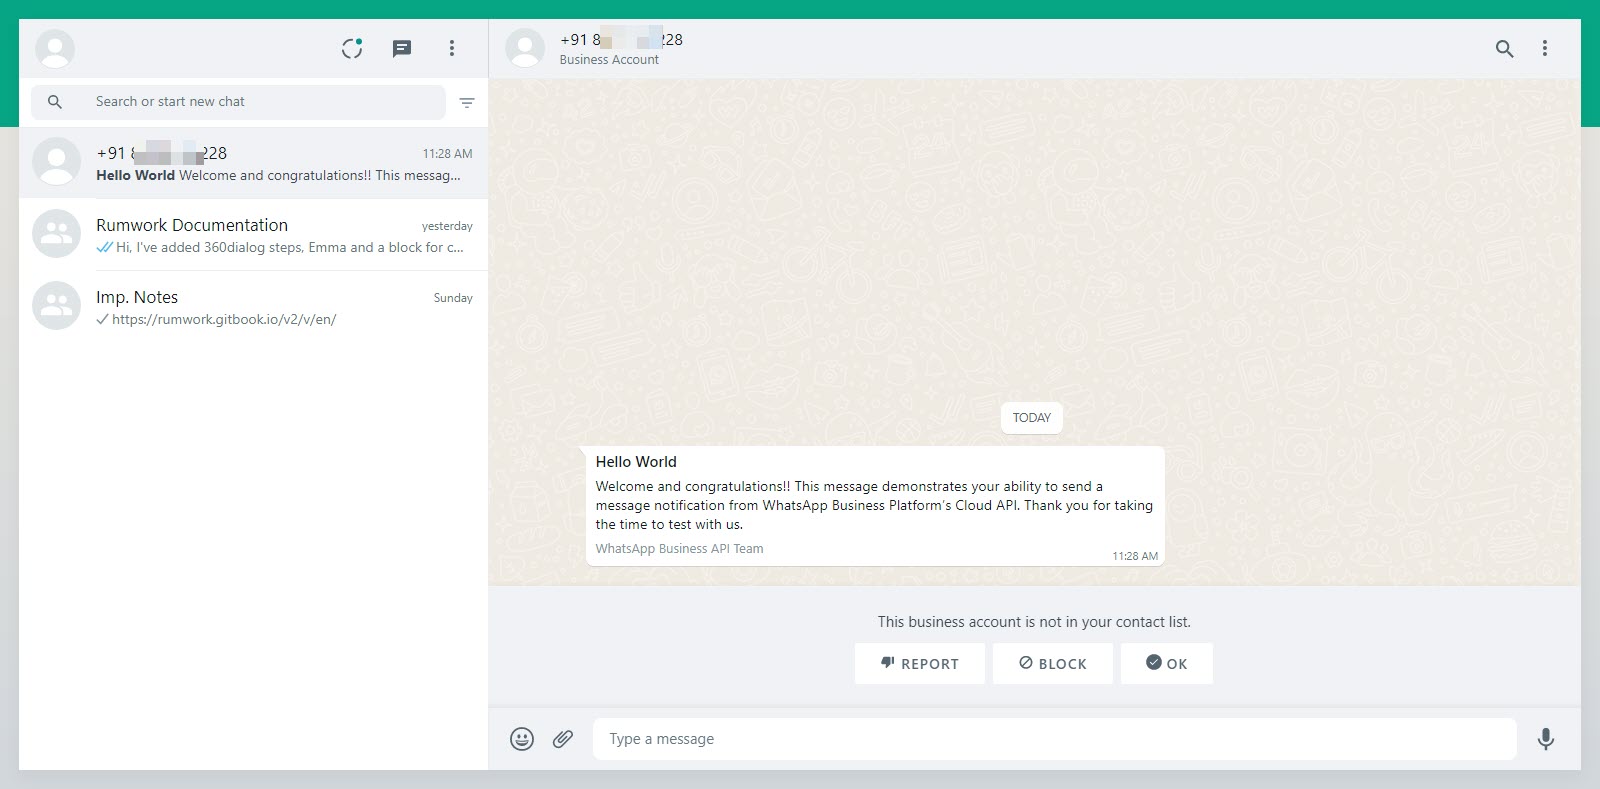
</p></figcaption></figure>

Once both numbers are added, click **Send message**.&#x20;

<figure><img src="https://files.gitbook.com/v0/b/gitbook-x-prod.appspot.com/o/spaces%2FhElFPtMZjXYjDDMBT5q2%2Fuploads%2FneIiEUwmONoPyp9LNpy9%2FWhatsApp%20Business%20Profile%20Test%20message.jpg?alt=media&#x26;token=57542452-ed3f-4c48-9ddd-39ef6b4981c9" alt=""><figcaption><p>Test Message</p></figcaption></figure>

If the number you've added for the WhatsApp Business Profile is working, the recipient will get the test message like the above. It means, your number is verified and you can continue with the setup.

### 3) WhatsApp Business Profile Verification&#x20;

Before you further proceed with steps to create a Rampwin Channel connected to Cloud API, it's must you verify the business profile first. And to do so, you've to visit <https://developers.facebook.com/>, select My Apps, and then click on the Business name.

<figure><img src="https://files.gitbook.com/v0/b/gitbook-x-prod.appspot.com/o/spaces%2FhElFPtMZjXYjDDMBT5q2%2Fuploads%2F5YKzgOu6MZqb8a6YFbrD%2FAccessing%20Business%20Manager%20to%20Verify%20Details.jpg?alt=media&#x26;token=b3240b57-d64b-4762-8a68-86499d8bd76e" alt=""><figcaption><p>
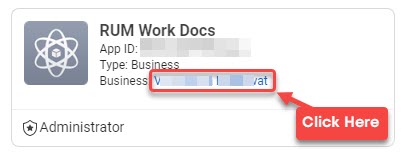
Accessing Business Manager Account</p></figcaption></figure>

On the Business Settings page, scroll down the left tab and select Business Info.

<figure><img src="https://files.gitbook.com/v0/b/gitbook-x-prod.appspot.com/o/spaces%2FhElFPtMZjXYjDDMBT5q2%2Fuploads%2F7ESJqVoOZJhnhPAGtHvL%2FAccessing%20Business%20Info.jpg?alt=media&#x26;token=308af17d-bb57-408c-8c28-dea302cae33a" alt=""><figcaption><p>
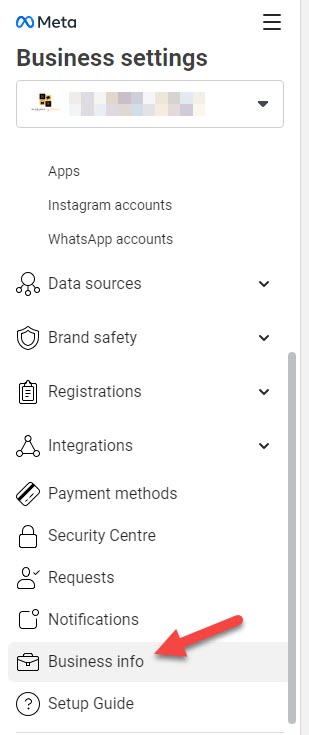
Accessing Business Info</p></figcaption></figure>

Then, on the Business information page, add information in the Business details section.

<figure><img src="https://files.gitbook.com/v0/b/gitbook-x-prod.appspot.com/o/spaces%2FhElFPtMZjXYjDDMBT5q2%2Fuploads%2FrTU48I2YM3MT4d8dErNw%2FBusiness%20details.jpg?alt=media&#x26;token=5ba260d0-da6d-4e13-a831-7313e98317a3" alt=""><figcaption><p>
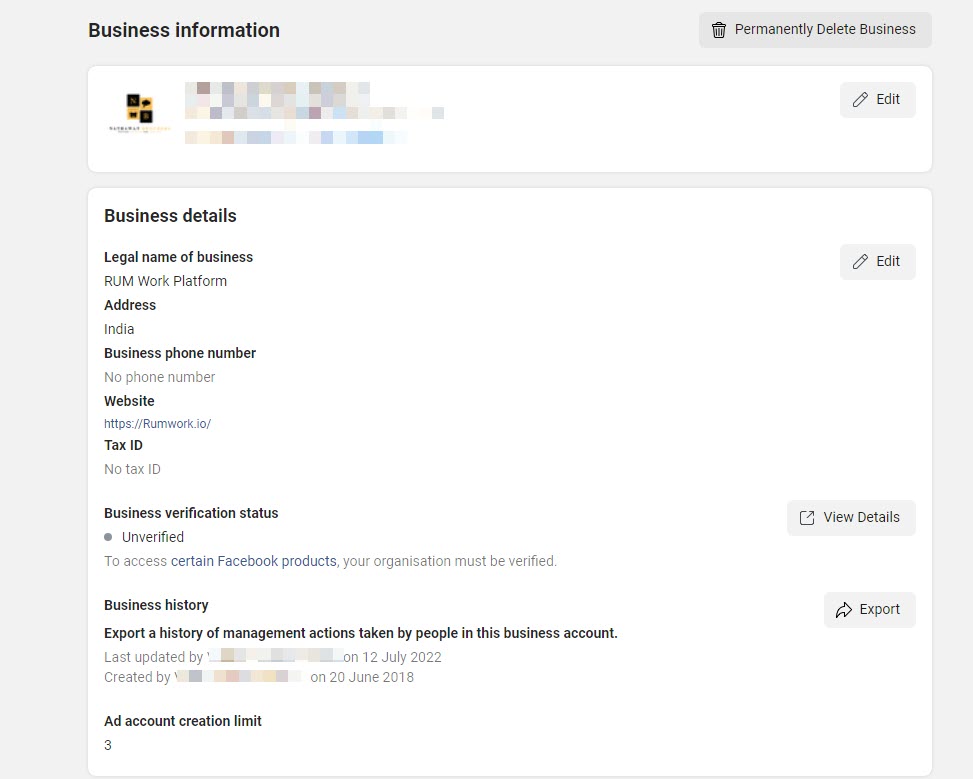
Business Details Page</p></figcaption></figure>

Once added the required information, you can continue with the next step.

### 4) Create a RampwinCloud API Channel

You've created a WhatsApp Business Profile, now you can connect Rampwin to it. In order to do so, log in to your Rampwin account, then go to Channels, and click **Configure** for Cloud API.

<figure><img src="https://files.gitbook.com/v0/b/gitbook-x-prod.appspot.com/o/spaces%2FhElFPtMZjXYjDDMBT5q2%2Fuploads%2FRvCWryGsIhj0FlefqRnz%2FAccessing%20Channels%20for%20Cloud%20API.jpg?alt=media&#x26;token=e4316821-a0d0-4675-bb80-1c0e8d979e81" alt=""><figcaption><p>
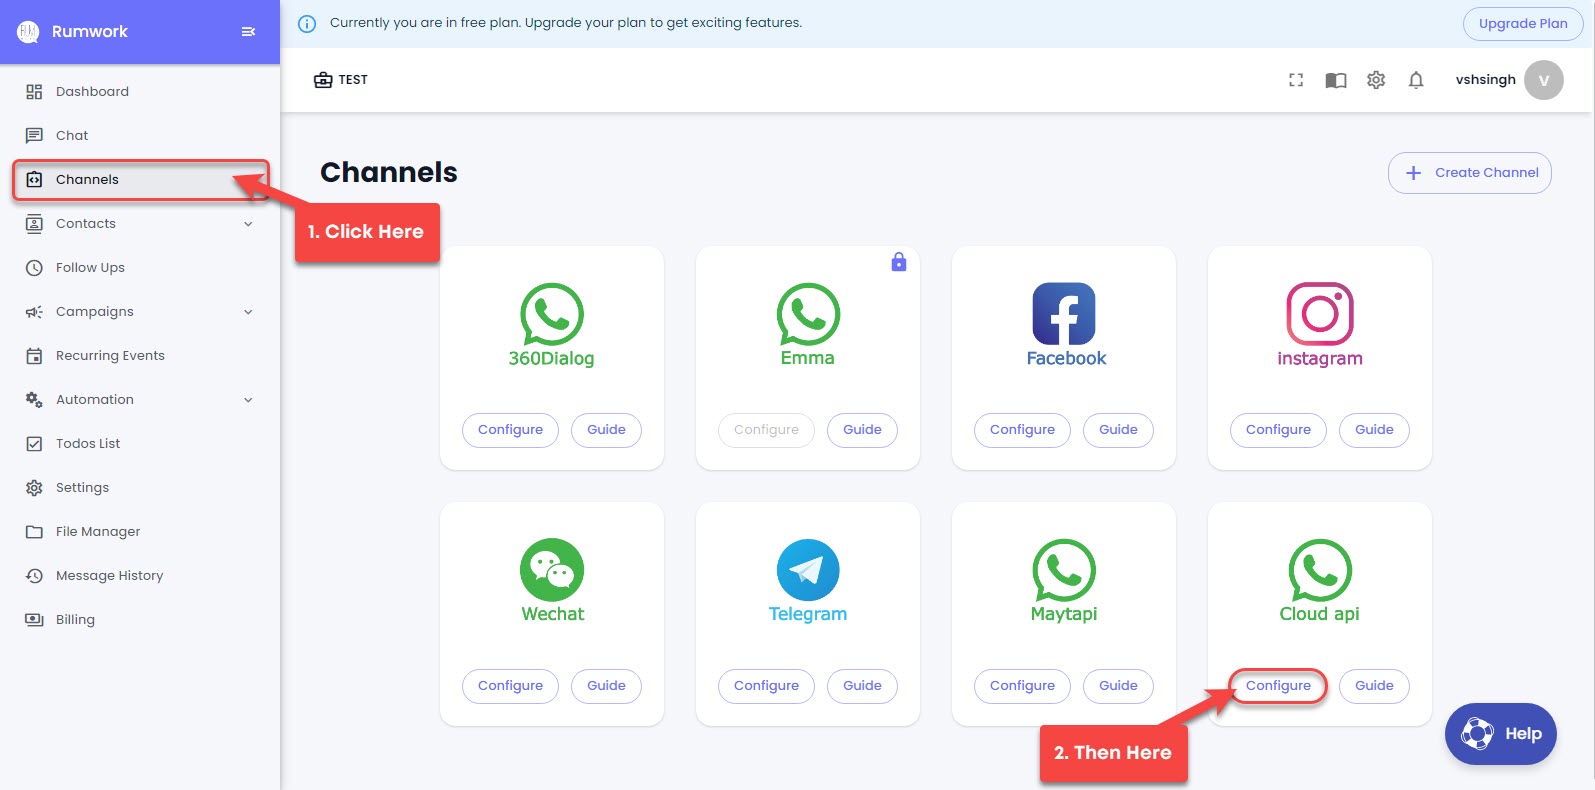
Creating Cloud API Channel Through Configure</p></figcaption></figure>

Or you could click *Create Channel* if there are channels already in the list.

<figure><img src="https://files.gitbook.com/v0/b/gitbook-x-prod.appspot.com/o/spaces%2FhElFPtMZjXYjDDMBT5q2%2Fuploads%2FxiVrYBMugeDiHrzgQMjQ%2FCreating%20Cloud%20API%20Channel%20Through%20Create%20Channel.jpg?alt=media&#x26;token=69dfcd61-9638-4bd5-997c-b459d0821c1e" alt=""><figcaption><p>
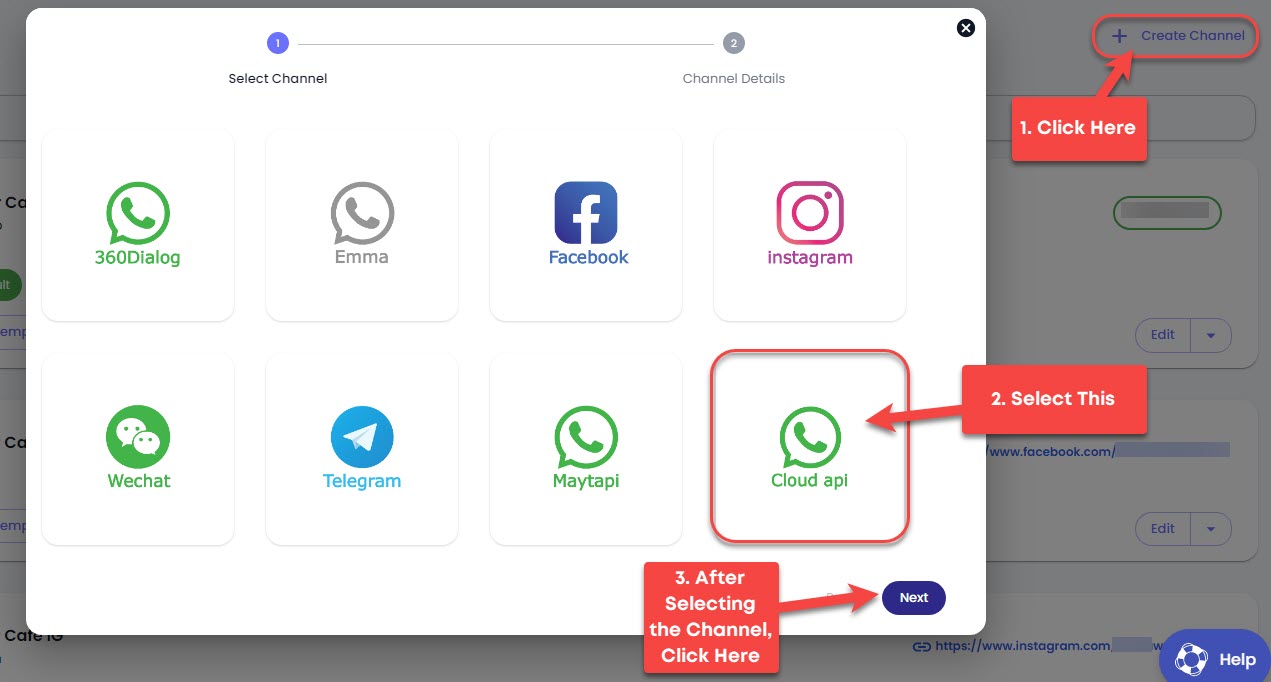
Create Channel Option</p></figcaption></figure>

As soon as you click the Next button, a popup will appear with several fields. In those fields, you've to set Channel Title, System User Access Token and Business Manager ID.&#x20;

<figure><img src="https://files.gitbook.com/v0/b/gitbook-x-prod.appspot.com/o/spaces%2FhElFPtMZjXYjDDMBT5q2%2Fuploads%2FwZjdXO5LhTtHcZkteZ4g%2FCloud%20API%20Channel%20Details%20Popup.jpg?alt=media&#x26;token=22877393-ac2f-495c-a53d-3911a6ad68f7" alt=""><figcaption></figcaption></figure>

For Title, you can set anything that will help you recognise the channel. For System User Access Token, you've to access your WhatsApp Application to generate it using the *Webhook URL* and *Verify Token* mentioned in the above channel details.

#### Edit Webhook Callback URL and Verify Token

First, go to <https://developers.facebook.com/apps/>, then select the app.

<figure><img src="https://files.gitbook.com/v0/b/gitbook-x-prod.appspot.com/o/spaces%2FhElFPtMZjXYjDDMBT5q2%2Fuploads%2FkMxzUddgVrsFLGki8RCY%2FSelecting%20the%20App%20for%20System%20Access%20Token.jpg?alt=media&#x26;token=d10a0c9e-6895-4c94-b3ce-622587a4b4c1" alt=""><figcaption></figcaption></figure>

This will open the app dashboard like the following. There, click on WhatsApp and select Configuration.

<figure><img src="https://files.gitbook.com/v0/b/gitbook-x-prod.appspot.com/o/spaces%2FhElFPtMZjXYjDDMBT5q2%2Fuploads%2Fov4x6yWOzEezRZejHhlp%2FOpening%20Webhook%20Configuration%20Window%20for%20Cloud%20API.jpg?alt=media&#x26;token=6f9f2e11-1b7f-479a-b346-989388a96ca3" alt=""><figcaption></figcaption></figure>

Then, on the Configuration page, click **Edit** in the Webhook section.

<figure><img src="https://files.gitbook.com/v0/b/gitbook-x-prod.appspot.com/o/spaces%2FhElFPtMZjXYjDDMBT5q2%2Fuploads%2FTX2mNBaJyL0kLpUQKrjT%2FConfiguration%20Webhook%20edit.jpg?alt=media&#x26;token=39806c12-354d-4d91-8a63-5bed07d07547" alt=""><figcaption><p>
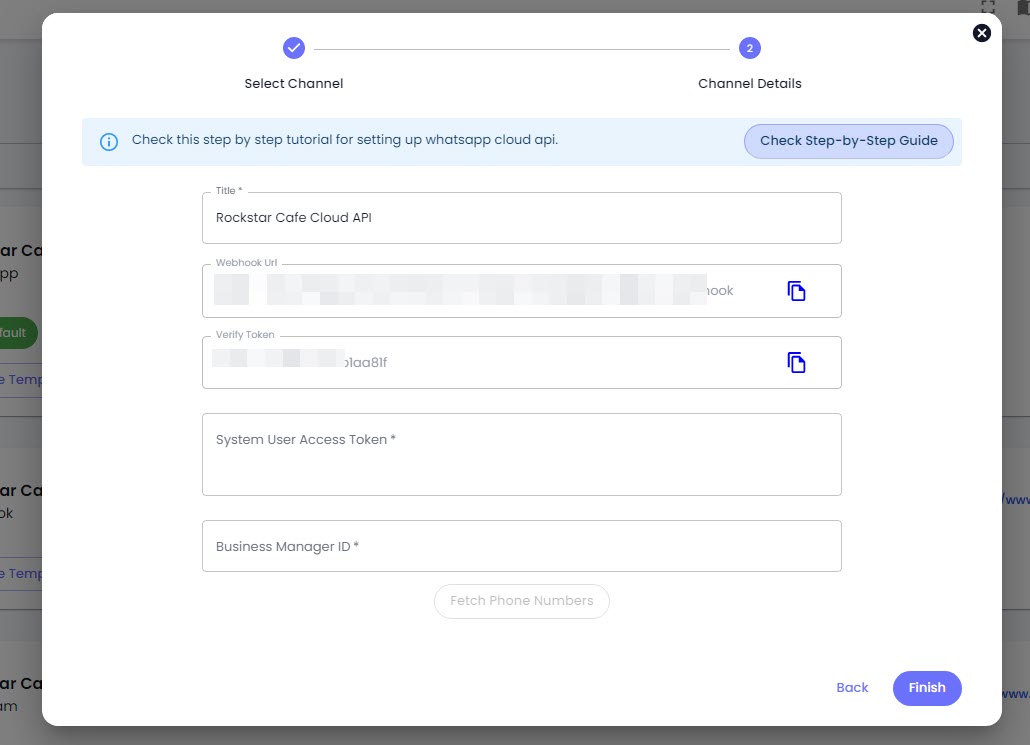
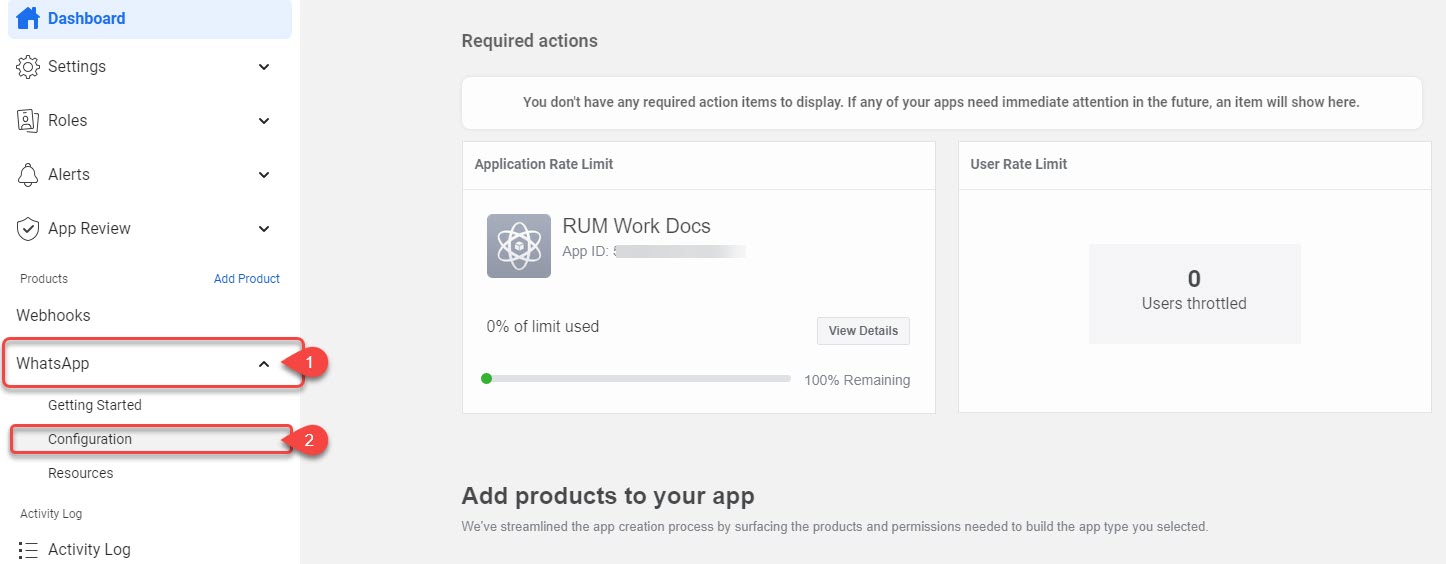
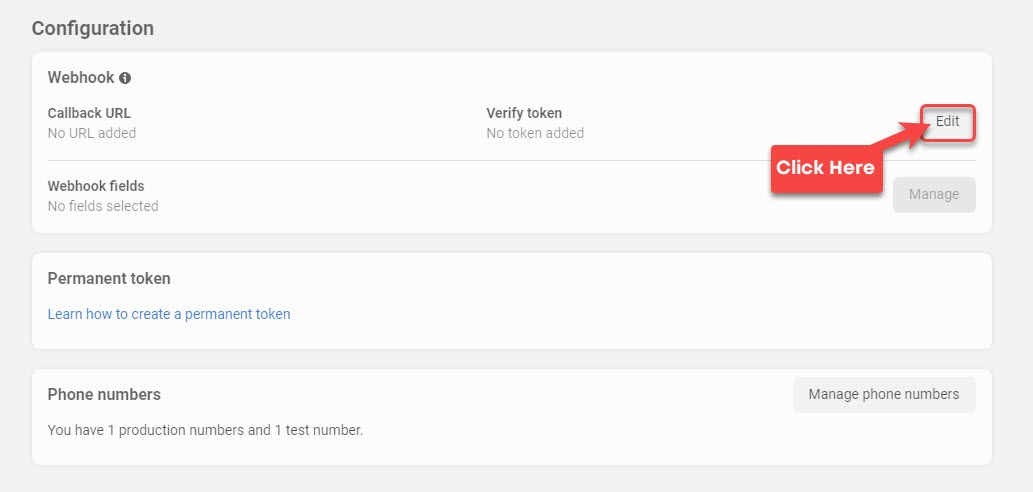
Configuration Page Webhook Edit</p></figcaption></figure>

This will open the following Webhook's callback URL popup.

<figure><img src="https://files.gitbook.com/v0/b/gitbook-x-prod.appspot.com/o/spaces%2FhElFPtMZjXYjDDMBT5q2%2Fuploads%2FNZwkGhSUz43PoClFC2mn%2FWebhook%20Callback%20URL%20Popup.jpg?alt=media&#x26;token=fc33680b-62e4-4d87-b8ae-d8ee80efe31d" alt=""><figcaption></figcaption></figure>

Here, you need to paste the values available in the Channel Details at Rampwin.

<figure><img src="https://files.gitbook.com/v0/b/gitbook-x-prod.appspot.com/o/spaces%2FhElFPtMZjXYjDDMBT5q2%2Fuploads%2FmhxwKCfNTsfx41FjCs4q%2FCopying%20Webhook%20URL%20and%20Verify%20Token.jpg?alt=media&#x26;token=4aad033f-8606-4528-b7fe-5e59ab62add1" alt=""><figcaption><p>
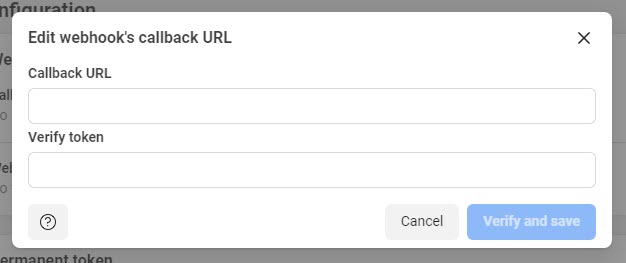
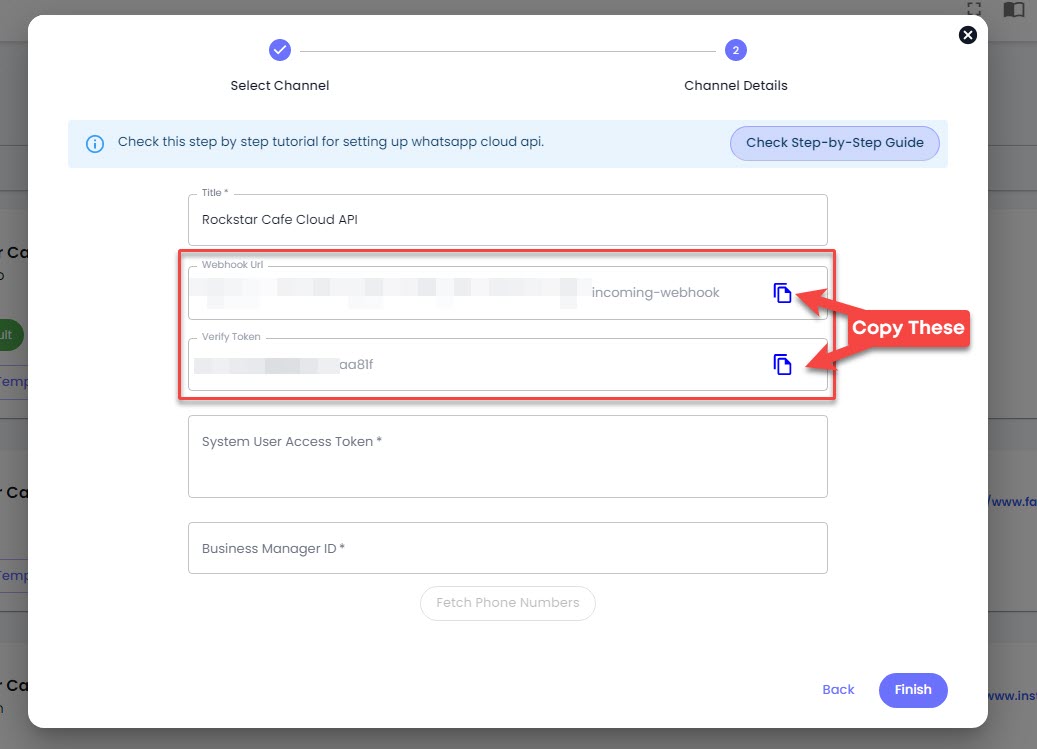
Copying Webhook URL and Verify Token Value</p></figcaption></figure>

First copy the Webhook URL, then Verify Token and paste them into the Webhook's callback URL. You've to copy and paste the values individually.

<figure><img src="https://files.gitbook.com/v0/b/gitbook-x-prod.appspot.com/o/spaces%2FhElFPtMZjXYjDDMBT5q2%2Fuploads%2F3Nod6ClKfmPj7MCuSZVP%2FAdding%20values%20to%20the%20Webhook%20Callback%20URL.jpg?alt=media&#x26;token=f0e1283e-c57d-4fa0-96b3-b64ff3d7f0b8" alt=""><figcaption><p>
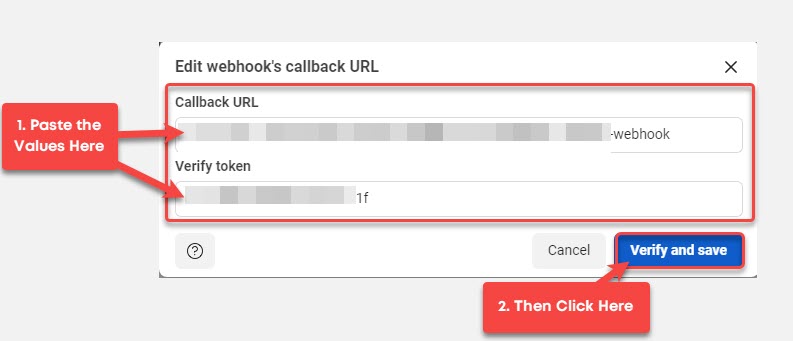
Adding Values to the Webhook Callback URL</p></figcaption></figure>

Once added both the values click on **Verify and save**. After saving the webhook URL, click **manage** to select webhook fields.

<figure><img src="https://files.gitbook.com/v0/b/gitbook-x-prod.appspot.com/o/spaces%2FhElFPtMZjXYjDDMBT5q2%2Fuploads%2FZg7nTTyLKmi1XPjIiPf6%2FSubscribing%20to%20all%20Webhook%20Fields.jpg?alt=media&#x26;token=a952e38e-6127-486e-83ae-9a9abfe32de6" alt=""><figcaption><p>
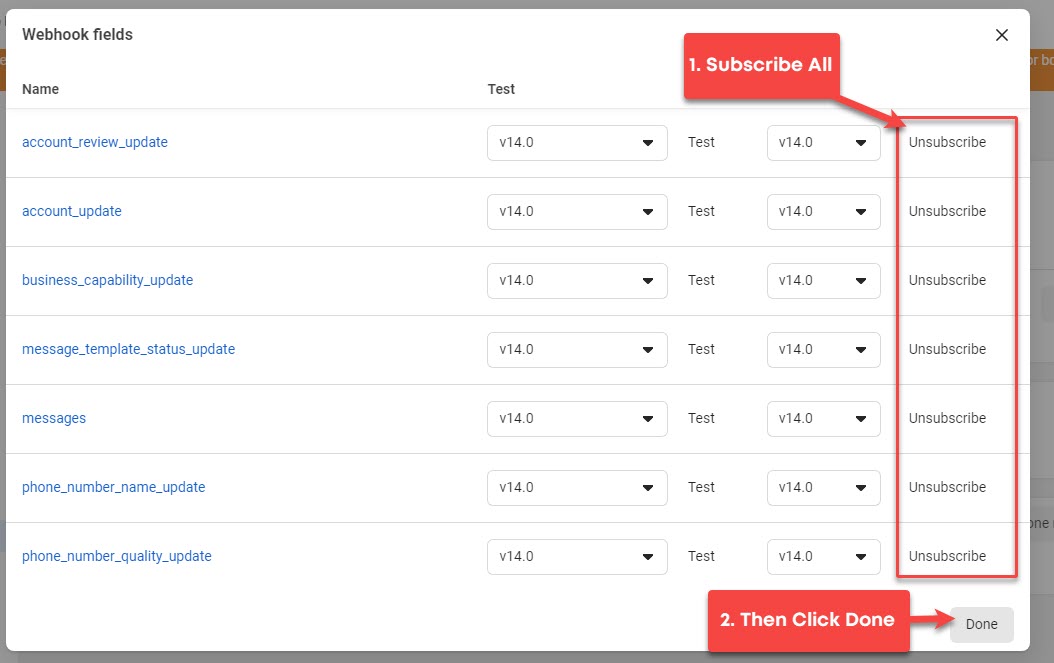
Subscribing to Webhook Fields</p></figcaption></figure>

You'll see multiple webhook fields. *Subscribe* to all and then click **Done**. After this, you'll see your subscribed webhook fields in the configuration section.

<figure><img src="https://files.gitbook.com/v0/b/gitbook-x-prod.appspot.com/o/spaces%2FhElFPtMZjXYjDDMBT5q2%2Fuploads%2FdvbsMleSWNYx1kt7VaQH%2FSubscribed%20Webhook%20field.jpg?alt=media&#x26;token=dd36e4c6-cde6-461f-a615-adc506f6b063" alt=""><figcaption><p>Subscribed Webhook Fields</p></figcaption></figure>

Now, you can generate the System User Access Token

#### Generating System User Access Token

To generate the System User Access Token for Cloud API Channel at Rampwin, you need to go to <https://business.facebook.com/settings/>, there select the Business account manager you've used to create the WhatsApp application.

<figure><img src="https://files.gitbook.com/v0/b/gitbook-x-prod.appspot.com/o/spaces%2FhElFPtMZjXYjDDMBT5q2%2Fuploads%2FlBUtlcDeHlaR8fo8PMoP%2FSelecting%20Business%20Account%20Manager%20to%20Generate%20Access%20Token.jpg?alt=media&#x26;token=4fe42e76-c9c1-4a72-b2a0-629b9f1afa5d" alt=""><figcaption><p>
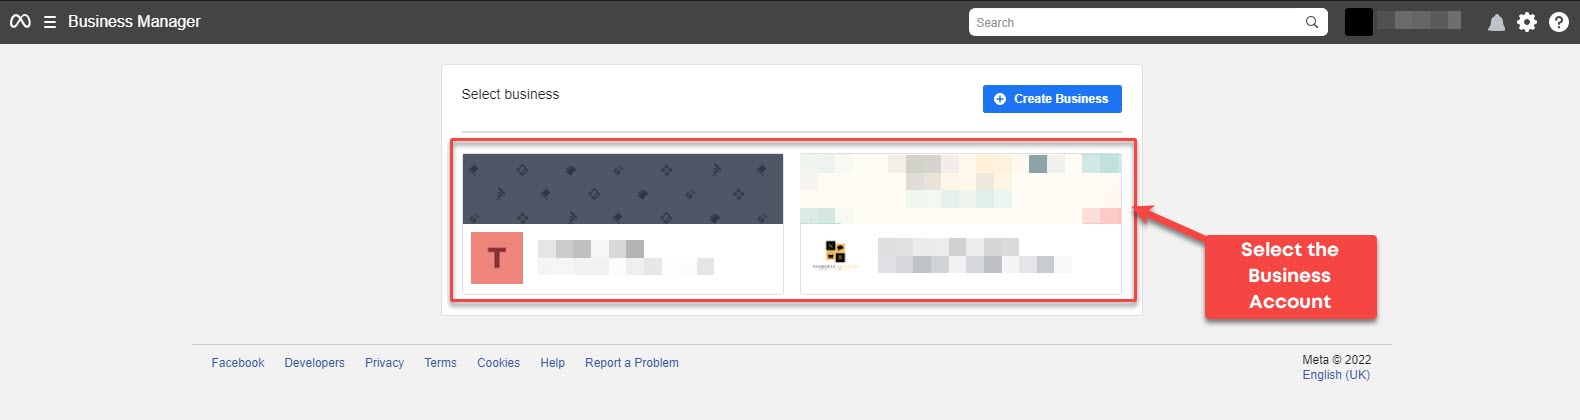
Selecting Business Account Manager</p></figcaption></figure>

Based on your selection, it will open the Meta Business Settings. There, you'll have to go to the Users → System Users → click **Add**.

<figure><img src="https://files.gitbook.com/v0/b/gitbook-x-prod.appspot.com/o/spaces%2FhElFPtMZjXYjDDMBT5q2%2Fuploads%2FHVQrNqbQgnjxSvxRnEM8%2FAdding%20System%20User.jpg?alt=media&#x26;token=bd8cd177-c721-4a2f-ad86-f668dbd69cec" alt=""><figcaption><p>
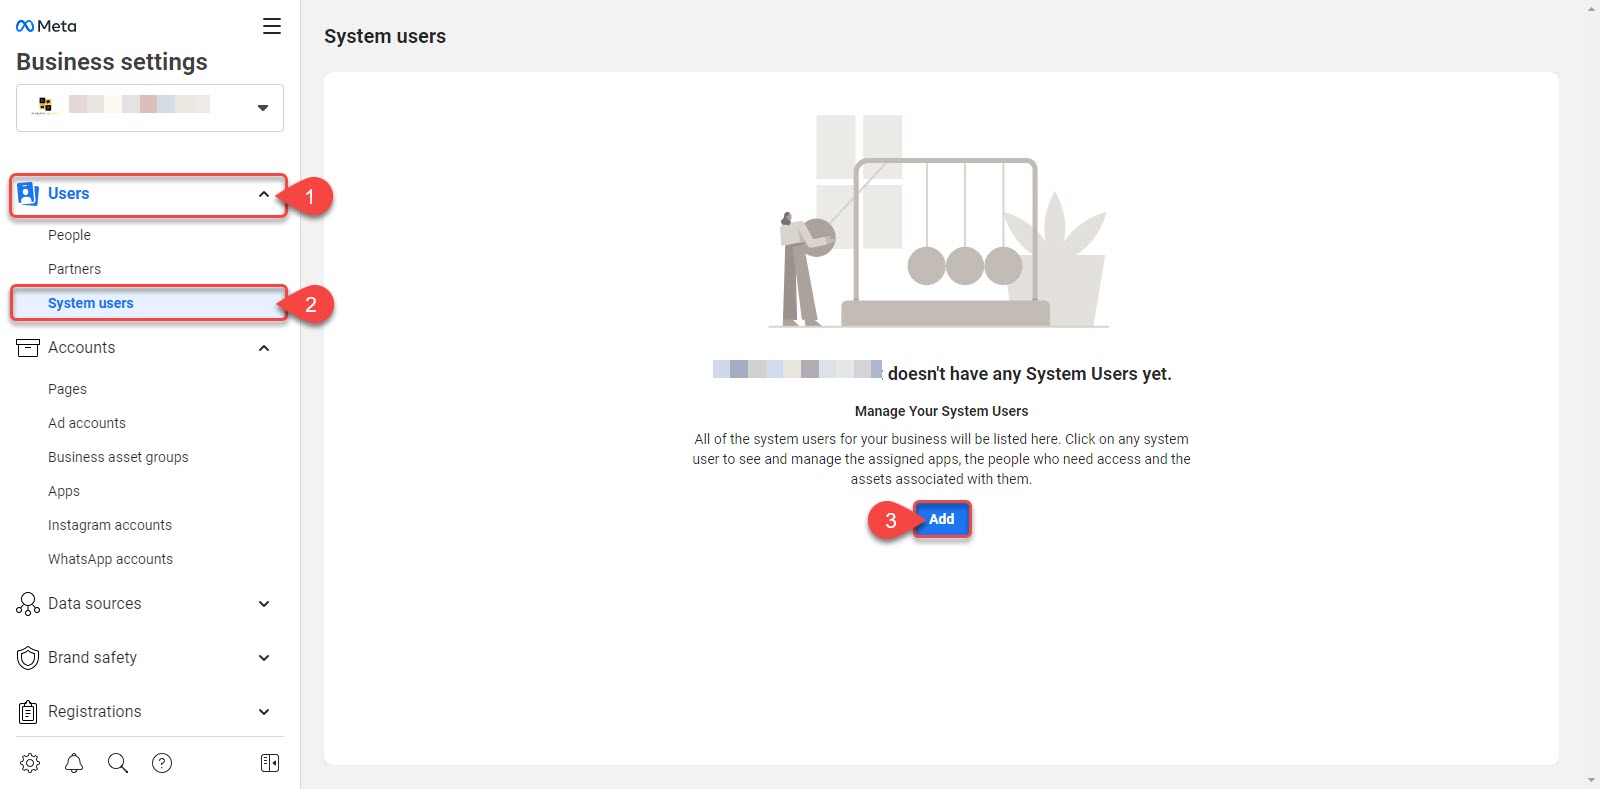
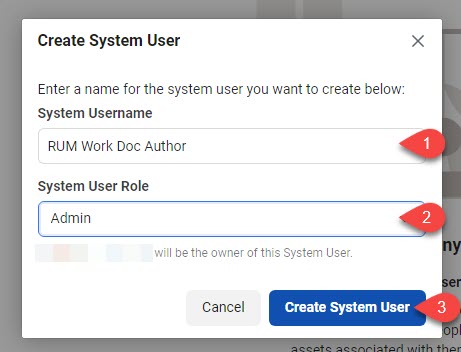
Adding a System User
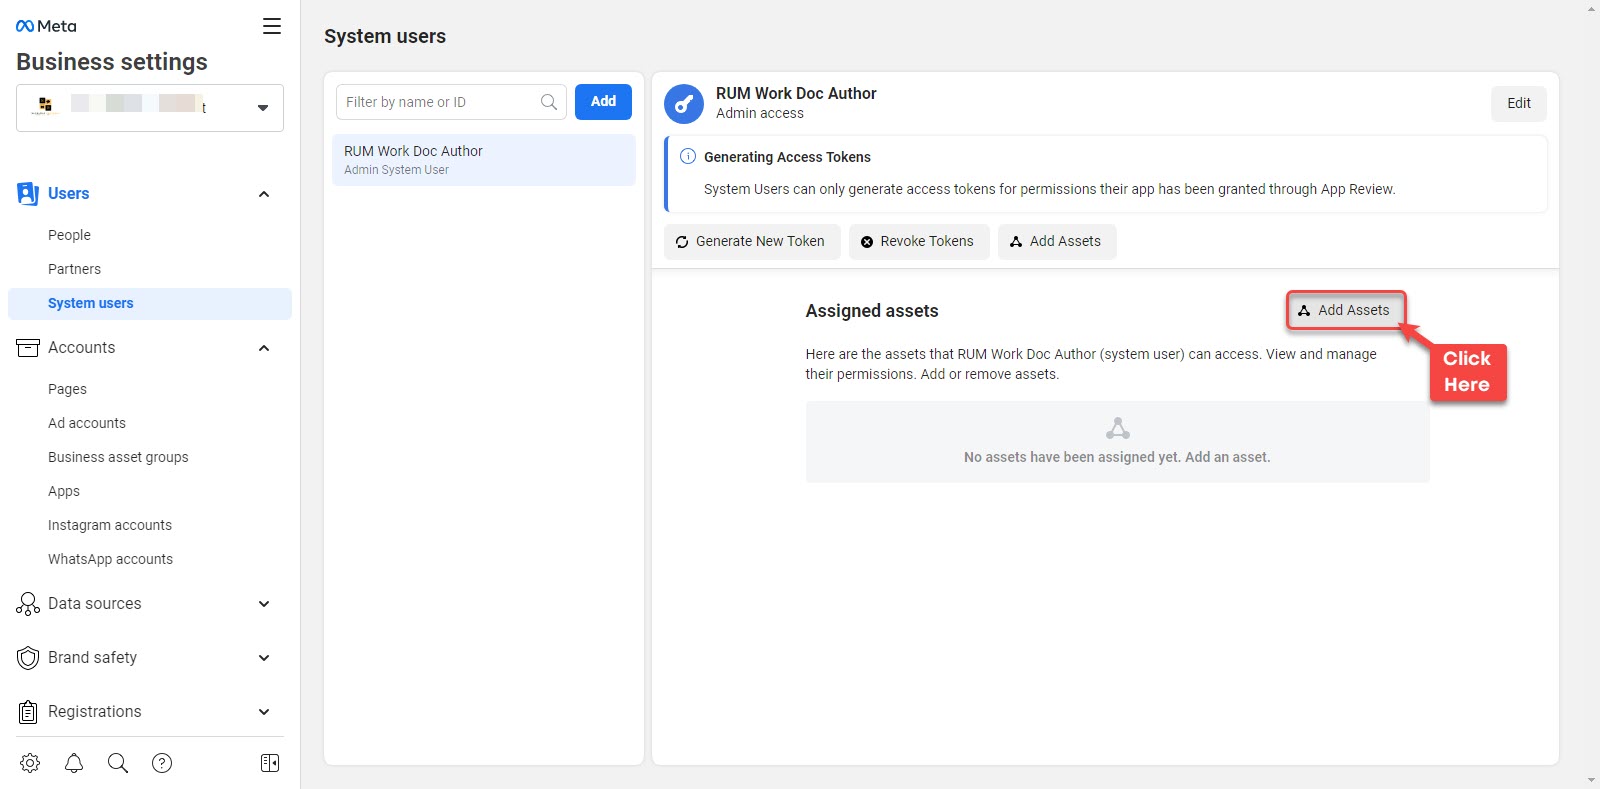
</p></figcaption></figure>

It will open a terms modal, simply click **I Accept**, then **Done** and on the next window, enter details as,

* System Username - The name you want to assign to this user.
* System User Role - Admin.

<figure><img src="https://files.gitbook.com/v0/b/gitbook-x-prod.appspot.com/o/spaces%2FhElFPtMZjXYjDDMBT5q2%2Fuploads%2FU9Eei9a9zzen6GyxjDa5%2FCreating%20System%20User.jpg?alt=media&#x26;token=5eaf90a1-76cb-45f8-9224-91db6f8d6c74" alt=""><figcaption></figcaption></figure>

Once given the username and assigned the Admin role, click **Create System User**. This will take a few moments to create the system user. Once the user has been created it will ask you to accept the terms.&#x20;

So, click **I Accept** then **Done**, and you'll have your System User page as the following.

<figure><img src="https://files.gitbook.com/v0/b/gitbook-x-prod.appspot.com/o/spaces%2FhElFPtMZjXYjDDMBT5q2%2Fuploads%2FQpQeE6LFGRGfw9tjLdiO%2FAdd%20Assets.jpg?alt=media&#x26;token=0e9e79d2-205f-4304-966c-bfd7b4499bb6" alt=""><figcaption><p>Adding Assets</p></figcaption></figure>

Here, click **Add Assets**.

An assigning assets popup will come for the System User in which you have to select **Apps** → **select the App** → **Toggle everything to YES** → then click **Save Changes** → **Done**.

<figure><img src="https://files.gitbook.com/v0/b/gitbook-x-prod.appspot.com/o/spaces%2FhElFPtMZjXYjDDMBT5q2%2Fuploads%2FM5wsdGXAdFhs2O7dO7OW%2FAssigning%20Assets%20to%20the%20Business%20System%20User.jpg?alt=media&#x26;token=a4e3a5ac-a47e-4061-899b-51f59ff315bb" alt=""><figcaption><p>
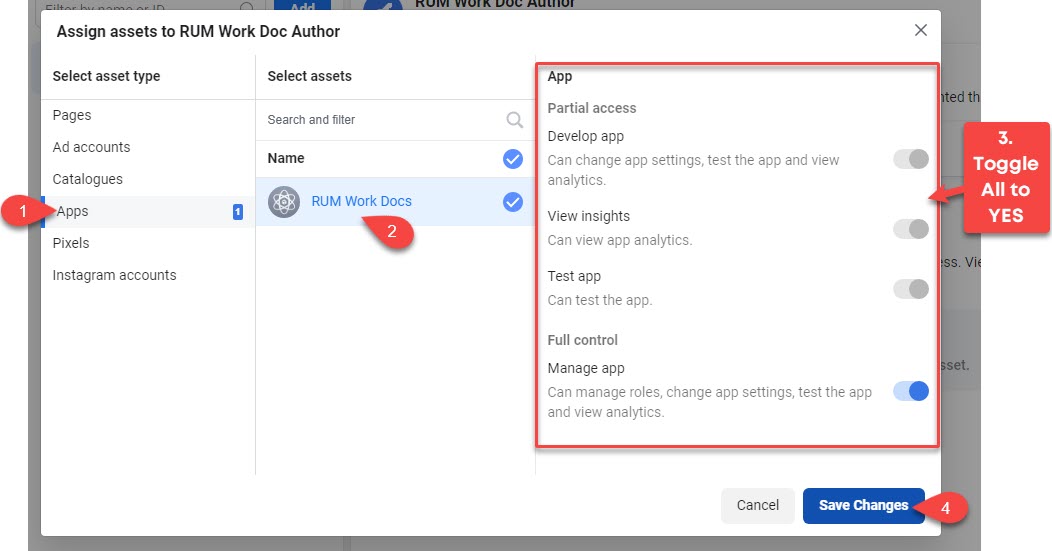
Assigning Asset to the System User
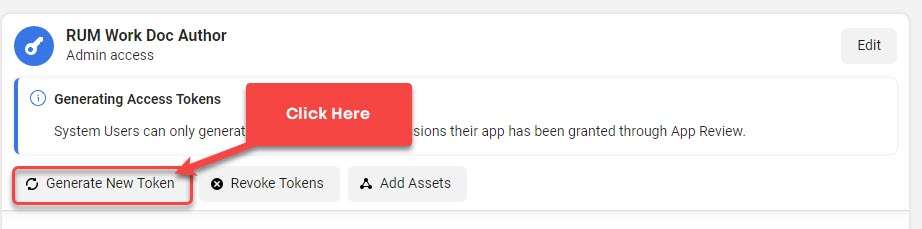
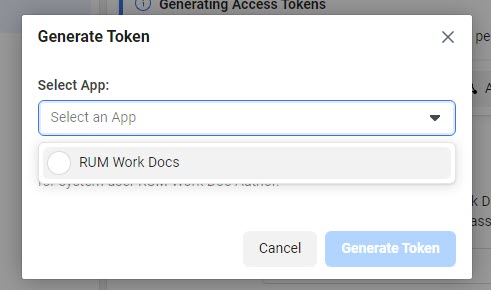
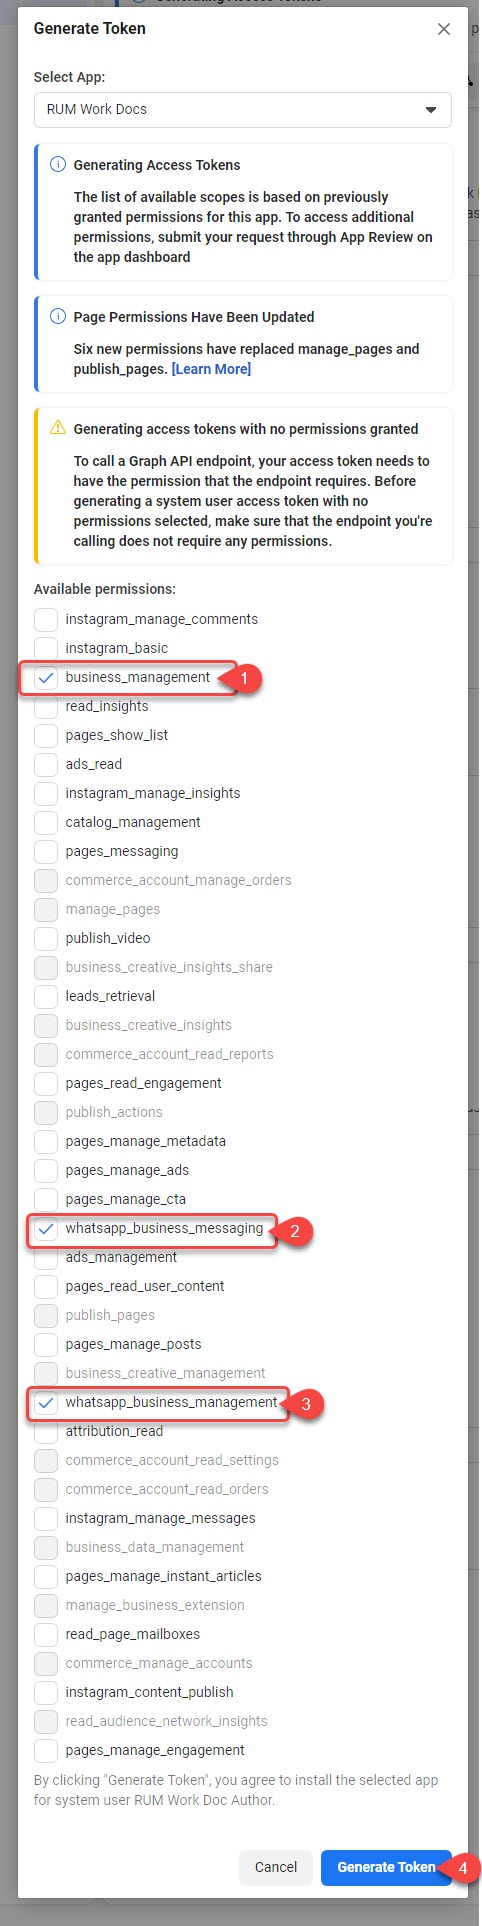
</p></figcaption></figure>

Once you finish assigning the asset, you can see the app in the System User Account.&#x20;

<figure><img src="https://files.gitbook.com/v0/b/gitbook-x-prod.appspot.com/o/spaces%2FhElFPtMZjXYjDDMBT5q2%2Fuploads%2FcJWSnxyaIQaxYMJhFYGm%2FAdded%20Asset%20to%20the%20System%20User.jpg?alt=media&#x26;token=46e2ea33-7324-4ec9-be1d-956ed947c8ce" alt=""><figcaption></figcaption></figure>

Now to generate the System User Access Token, click **Generate New Token**.&#x20;

<figure><img src="https://files.gitbook.com/v0/b/gitbook-x-prod.appspot.com/o/spaces%2FhElFPtMZjXYjDDMBT5q2%2Fuploads%2Fq4TQ3BMOUzqVSXNfZaKT%2FGenerate%20New%20Token.jpg?alt=media&#x26;token=d6ded6f0-7fd5-4e6f-a2c3-989a1112fb13" alt=""><figcaption><p>Generate New Token</p></figcaption></figure>

Then select the App,

<figure><img src="https://files.gitbook.com/v0/b/gitbook-x-prod.appspot.com/o/spaces%2FhElFPtMZjXYjDDMBT5q2%2Fuploads%2FWgt4LgzypejTOj00a0A8%2FSelecting%20the%20App%20to%20Generate%20Token.jpg?alt=media&#x26;token=7dff6f55-a13c-4ac2-9699-4709f91964dc" alt=""><figcaption></figcaption></figure>

And once you select it, you'll find different permissions from which you have to select,

* business\_management
* whatsapp\_busines&#x73;*\_messaging*
* whatsapp\_business\_management

<figure><img src="https://files.gitbook.com/v0/b/gitbook-x-prod.appspot.com/o/spaces%2FhElFPtMZjXYjDDMBT5q2%2Fuploads%2FJjuOSEafFDiZ5nrjvaLl%2FEnabling%20Permissions%20to%20Generate%20Token.jpg?alt=media&#x26;token=74e9cda8-8784-4110-a0ba-6541ca85a2d5" alt=""><figcaption></figcaption></figure>

After selecting the permissions, click **Generate Token**. This will bring the access token which you have to copy and save on your cloud storage or local system. Once copied, click OK.

<figure><img src="https://files.gitbook.com/v0/b/gitbook-x-prod.appspot.com/o/spaces%2FhElFPtMZjXYjDDMBT5q2%2Fuploads%2FpewKyp1QPiTvYEJVdsR4%2FAccess%20Token%20Popup.jpg?alt=media&#x26;token=d8bce6a8-b3cb-439c-ad96-22a013b57376" alt=""><figcaption><p>
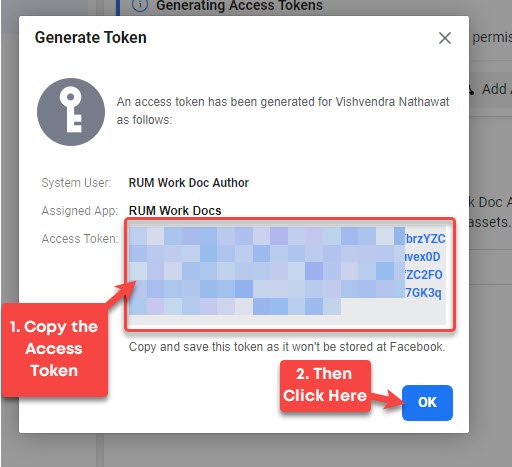
Copying Access Token</p></figcaption></figure>

Now, head back to Rampwin, and paste the access token in the System User Access Token Field.

<figure><img src="https://files.gitbook.com/v0/b/gitbook-x-prod.appspot.com/o/spaces%2FhElFPtMZjXYjDDMBT5q2%2Fuploads%2FTbEI2SEYucr7Km3rzEGG%2FPasting%20Access%20Token.jpg?alt=media&#x26;token=8ca20969-9aeb-4c5e-8182-34944ab1a7d2" alt=""><figcaption><p>
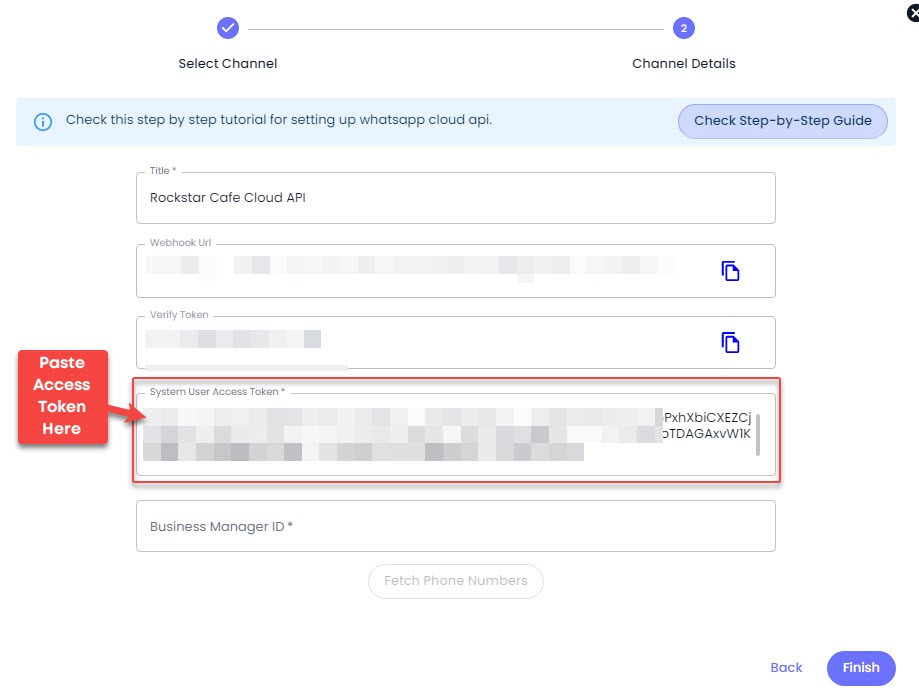
Pasting Access Token</p></figcaption></figure>

Then, visit the System User again, and copy the business id from the URL.&#x20;

<figure><img src="https://files.gitbook.com/v0/b/gitbook-x-prod.appspot.com/o/spaces%2FhElFPtMZjXYjDDMBT5q2%2Fuploads%2F10BBHghjrvCrpP9VXEbn%2FCopying%20Business%20Manager%20ID.jpg?alt=media&#x26;token=c87f685a-80ff-4b0a-9dba-5b096ae5c1b2" alt=""><figcaption><p>
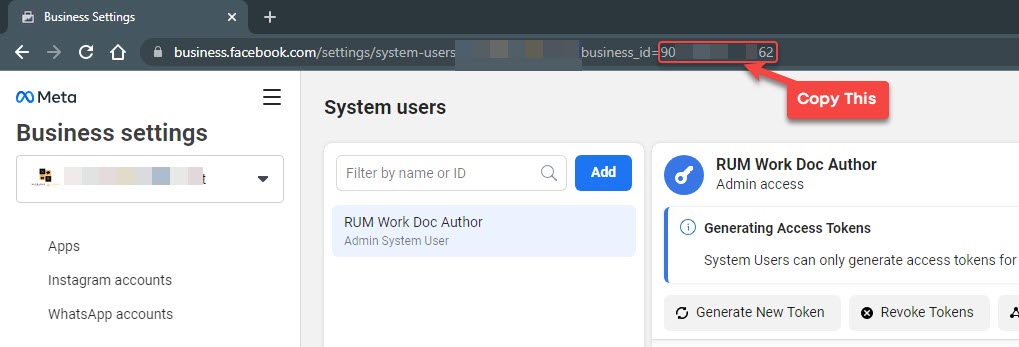
Copying Business Manager ID</p></figcaption></figure>

Head back to Rampwin again and paste the Id in the Business Manager ID field. Then, click **Fetch Numbers**.

<figure><img src="https://files.gitbook.com/v0/b/gitbook-x-prod.appspot.com/o/spaces%2FhElFPtMZjXYjDDMBT5q2%2Fuploads%2Fdm7NRNTMjfmLgt6NLxz6%2FAdding%20Business%20Manager%20ID%20and%20Fetching%20Number.jpg?alt=media&#x26;token=b10d2924-b451-4f49-943c-0af0f59bcdc3" alt=""><figcaption><p>Adding Business Manager ID and Fetching Phone Numbers</p></figcaption></figure>

This will showcase the WhatsApp Business Accounts and the Phone Numbers Associated with them.

<figure><img src="https://files.gitbook.com/v0/b/gitbook-x-prod.appspot.com/o/spaces%2FhElFPtMZjXYjDDMBT5q2%2Fuploads%2FQptGrPF9YbwCb0kD382u%2FFinal%20Step%20Cloud%20API.jpg?alt=media&#x26;token=9649bac4-05dc-46d5-b5e0-7f90c757e6c9" alt=""><figcaption><p>
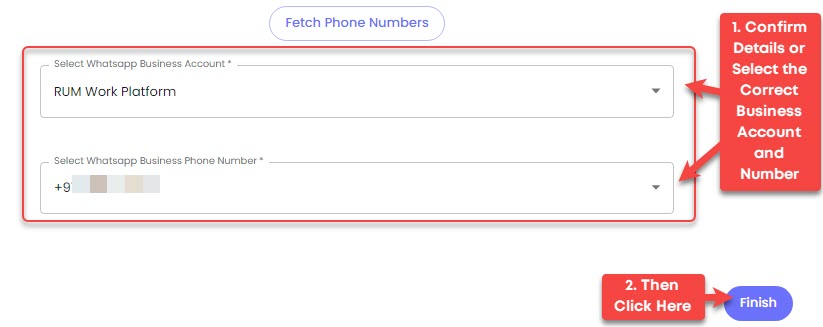
WhatsApp Business Account and Phone Number</p></figcaption></figure>

Confirm the details or select a different account and number, then click **Finish**. That's it; you've successfully created a Rampwin Channel and connected it to Cloud API.

<figure><img src="https://files.gitbook.com/v0/b/gitbook-x-prod.appspot.com/o/spaces%2FhElFPtMZjXYjDDMBT5q2%2Fuploads%2F5naEMJBVIC6e9undBOfB%2FWhatsApp%20Cloud%20API%20in%20RUM%20Work%20Channels.jpg?alt=media&#x26;token=82c61297-1042-40a5-a13f-33eef33ff1a3" alt=""><figcaption></figcaption></figure>

{% hint style="success" %}
Now, you can chat with customers over WhatsApp using the Rampwin Channel. However, you'll only be able to send and receive up to 1,000 free messages monthly. To increase the limit, you've to add a payment method.
{% endhint %}

### Channel Configuration

The additional options available for the Channel enable you to utilise it at its best.

<figure><img src="https://files.gitbook.com/v0/b/gitbook-x-prod.appspot.com/o/spaces%2FhElFPtMZjXYjDDMBT5q2%2Fuploads%2FQ4hebgcgt63n1ZWOyECX%2FChannel%20Configuration%20Options.png?alt=media&#x26;token=def1dfcc-a254-4c7d-8d5c-bc05b39f59c0" alt=""><figcaption></figcaption></figure>

* **Details** - Using this access additional options to create Message Templates, [**Buttons/Options/Product Messages**](#button-options-product-messages), Store Settings, and more.&#x20;
* [**Manage Templates**](#set-up-message-template) - Directly access the controls to manage or create message templates.
* [**Store Settings**](#store-settings) - Configure payment partners and links for the channel.
* [**Manage Profile**](#manage-profile) - Make changes to the WhatsApp Business Profile.
* [**Edit**](#more-options) - Access controls to edit channel; copy its id and more.

### Set Up Message Template

Refer to the following docs.

### Button/Options/Product Messages

Refer to the following docs

### Store Settings

Please, explore the following doc to learn more about Rampwin WhatsApp Channel Store Settings.

### Manage Profile

Using the Manager Profile option of your Cloud API WhatsApp Channel, you can change your business details for WhatsApp.

<figure><img src="https://files.gitbook.com/v0/b/gitbook-x-prod.appspot.com/o/spaces%2FhElFPtMZjXYjDDMBT5q2%2Fuploads%2Ff0OeyHiWUACV90F32uhI%2FAccessing%20Manager%20Profile.png?alt=media&#x26;token=9a04411a-d35f-4aa6-830a-9d674ea973ea" alt=""><figcaption></figcaption></figure>

Click on the Manage Profile, and it opens the Profile settings like the following,

<figure><img src="https://files.gitbook.com/v0/b/gitbook-x-prod.appspot.com/o/spaces%2FhElFPtMZjXYjDDMBT5q2%2Fuploads%2FshK6aWKo8epWxPY1LFr9%2FManage%20Profile%20Options.png?alt=media&#x26;token=b4250490-ff75-4de4-bd78-8ac8be21f6f3" alt=""><figcaption></figcaption></figure>

Here, you can change your Profile Picture, Address, Description, Email, Website and Business Vertical from the available options,

* Automotive Beauty
* Spa and Salon&#x20;
* Clothing and Apparel&#x20;
* Education&#x20;
* Entertainment&#x20;
* Event Planning and Service&#x20;
* Finance and Banking&#x20;
* Food and Grocery&#x20;
* Public Service&#x20;
* Hotel and Lodging&#x20;
* Medical and Health&#x20;
* Non-profit Professional Services&#x20;
* Shopping and Retail&#x20;
* Travel and Transportation&#x20;
* Restaurant&#x20;
* Other&#x20;

Once done, click **Save Changes**.

### More Options

In addition to the Manage Templates, Store Settings, and Manage Profile, there are a few more options you can utilise.

<figure><img src="https://1685557723-files.gitbook.io/~/files/v0/b/gitbook-x-prod.appspot.com/o/spaces%2FhElFPtMZjXYjDDMBT5q2%2Fuploads%2FPwUAKMB3e4WVQQkcLJNq%2FMaytapi%20Channel%20More%20Options.png?alt=media&#x26;token=7dd19682-7980-44c1-8f20-54570afbaa3e" alt=""><figcaption></figcaption></figure>

* **Edit** - It provides you with the option to change Channel Name; Add Webhook URL and Disconnection Alert Emails.

<figure><img src="https://1685557723-files.gitbook.io/~/files/v0/b/gitbook-x-prod.appspot.com/o/spaces%2FhElFPtMZjXYjDDMBT5q2%2Fuploads%2FBV9bk3c5C0Zd65MLnG18%2FEdit%20option%20of%20the%20Maytapi%20Channel.png?alt=media&#x26;token=58247f1e-1fd9-49b5-9785-aaaca53b9def" alt=""><figcaption></figcaption></figure>

* **Delete** - Simply delete the channel.
* **Mark as Default** - You'll see this particular channel as the primary channel in the Chat.
* **Copy Channel ID** - Copy Channel ID without opening the Phone Settings.
